Get started with AdSense (3)
The AdSense Ads
Once you have successfully completed the sign-up process and connected your site, you can check to see if your site has been approved in the AdSense dashboard under the 'Sites' menu item. Once the status is set to 'Ready,' you can begin serving ads.

Auto ads
You may have already seen the place where you can enable automatic ads when you signed in to 'Preview ads'. You can access this tool again from the Dashboard. Menu item: 'Ads' and then click on the 'Edit' pencil icon. .

My suggestion for getting started: Enable automatic ads first! AdSense will then analyse your site and place the ads in the right places. As is often the case with automatic systems, it won't always be 100% accurate, but it's a good place to start.

Digression: Data protection settings (GDPR)
Before you go any further, there is one more thing you need to be clear about: Your privacy settings. If you want to serve ads within the EEA or UK, you will need to obtain the consent of your website users. There are various Consent Management Platforms (CMP) that can do this for you, sometimes for a fee. From January 2024, you will be required to use a Google certified tool for AdSense.
Google AdSense also offers a free tool.
This might also interest you
Set up and use AdSense CMP - Tutorial

How can you easily set up the AdSense Consent Management Platform? Here I'll show you how to activate it in 4 steps, customise it for your site and then evaluate the results...
To the post Set up and use AdSense CMP - Tutorial
Once you have enabled automatic ads and clicked on 'Apply to site', AdSense will begin serving ads. However, you will usually need to be patient:
- First, the AdSense servers need to be updated.
- Secondly, the page needs to be analysed by the crawler in order to find appropriate ads for your page.
Pages that are visited less frequently will take longer to display ads.

AdSense has a number of useful automatic ad options that you can choose to use or discard.
Auto ads formats
AdSense has overhauled the auto-ad section, making it more structured and distinguishing between overlay and in-page formats. You can use these formats individually or in combination.
Overlay formats
The overlay formats are placed on top of the content and do not affect the design of the page.
Anchor ads
Anchor ads are placed at the top or bottom of a web page, making them highly visible when scrolling down a page.
Side rail ads
From the end of 2022, there will be another option for the desktop: On large monitors, ads will also appear on the sides.
Vignette ads
Vignette ads are available for both mobile and desktop viewing. The ad is fully served when you switch pages and must be closed before you can continue reading.
Set your own ad frequency now
Under 'More Settings' you can now set the frequency of the display! The default is 10 minutes. You can choose in 6 steps between 1 minute and 1 hour.

This ad has very high visibility and is the most profitable ad type for me. However, you should consider whether or how often you want your users to see this ad, which takes them out of the reading flow.
If you only want to use vignette ads and anchor ads on mobile devices, you can turn them off on large screens.
In-page formats
The in-page formats are placed in the content area of your website.
Banner ads
Formerly known as in-page ads, these are placed in the main text area of your page. AdSense automatically selects the location and adjusts the ad size accordingly. This is very handy, but sometimes it doesn't fit your site 100%. So my tip is to start with these ads and see the results on your site. If the ads interfere with your design, you can disable the banner ads and place the ads manually.
Multiplex ads
Multiplex ads are multiple ads grouped together, usually at the bottom of the page. The success of these ads depends very much on the theme of your site. I would definitely test and check if the ads are successful.
Related search
New addition: Related search. The algorithm inserts similar search queries in appropriate places on your site. The click is not paid. It leads to a search results page, which also contains ads. Only when someone clicks on one of these ads do you get a share of the revenue.
More automatic tools
Here you will also find some other tools that you can use to control and influence the display of automatic ads.
Number of ads
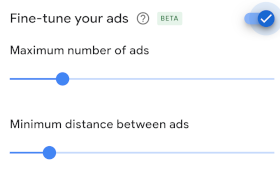
You have two options for setting here: The number and the distance between the ads. There are two sliders in the in-page format area. The minimum spacing is defined by the number of pixels.

Important tip: Start with 'minimum'. Although AdSense used to be very careful not to display too many ads on a page (there was a three-ads policy), and now has theBetter-Ads-Standardsin its policies, AdSense tends to overload pages with ads. So start with the minimum and test the page. If the ads are too sparse, you can increase the number using the slider.
Excluded areas
Here you can block certain areas of your site from in-page ads. This will also affect other pages with a similar layout. You would normally use this option to protect your design. For example, you often don't want ads in the header.
Possible areas are suggested and you can then exclude them. In practice, exclusion does not work 100% of the time because the automated systems encounter a large number of different website systems. However, if the ads interfere with your design, this is the first place you should try to find a solution.
Excluded pages
If you do not want to display ads on certain pages, such as error or response pages, you can specify the URL here.
Preview display settings
The preview shows you how the settings will affect you and where AdSense is likely to place ads.
You can use icons to switch between mobile and desktop views.

Manual ads
The advantage of manual ads is that you can place them more precisely and customise them to suit your design. The disadvantage is that it requires more work, as a script has to be integrated into the website code.
You can start creating manual ads from your dashboard under 'Ads' / 'Ads by unit'. This will give you an overview of the different options available.

Display ads
Display ads are the main manual ads and are recommended by AdSense because they can be used in almost all areas.

After clicking on the 'Display ads' card, you can set the properties of the ads:
- Name of the ad
- Shape: square, horizontal or vertical (for responsive ads)
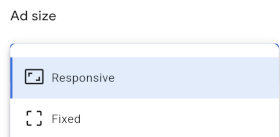
- Size: fixed size or responsive ad
The preview shows you sample ads. My recommendation here: Choose 'Responsive' as the size as the ads will fit into the free space. As the ads need to work on all possible display sizes, this is the best choice.

You can add to this in the 'Global settings' by activating the option: 'Let Google optimize the mobile ad size automatically'. Then the ads there will adapt well to your design.
Clicking on 'Create' will take you to the next page of the wizard and give you the code snippet to insert into the code of your website.
 Important to know: You can combine automatic and manual ads. Where you place a manual ad, no automatic ad will be displayed.
More manual ads
You can also choose from other manual ads that are suitable for certain types of websites:
- In-feed ads: They are suitable for pages with many articles and are often placed between the articles.
- In-article ads:They are particularly suitable for articles with a lot of text and fit well into the article design.
- Multiplex ads:We already know them from the auto ads. They are several ads with content recommendations that are played out together in a grid.
If you only want to display manual ads, you can disable the in-page ads in the automatic ads. This allows you to combine manual ads with vignette ads or anchor ads, for example.
Test, test, test...
Once you have created and integrated your ads, check your pages to make sure they fit into your design as intended. In particular, check that the ads display correctly at different screen sizes and that they do not overlap with your content. You may need to make some adjustments.
 Warning: Never click on ads on your page during testing, even if you are interested in them! Doing so could result in your AdSense account being limited, blocked, or even terminated.
Then it is time to test. Monitor the results and returns of the ads. In the reports, 'Ad formats' and 'Ad units' are particularly useful in this context. As AdSense results are very volatile, give yourself enough time to get meaningful results.
AdSense supports you with the tests. In the menu 'Optimisation'/'Experiments' you can create your own tests and have them evaluated by AdSense. In addition to blocking certain categories, such as sensitive ads, you can also test the settings and formats of the auto ads.
The next part (4) of the AdSense for beginners series will look at verifications:
- Address verification by PIN
- Identity verification
- payment method
AdSense registration: More verifications
About the author


Michael Dilger-Hassel aka Milanex
Since 2011 I have been involved with all aspects of successful websites as a publisher and since 2015 I have been active in several support forums on the topic of AdSense and webmasters under the nickname 'Milanex'.
As a Google product expert 'Diamond', I have been supporting other publishers on a voluntary basis for years on all questions concerning Google AdSense.
In this blog, I take up questions from the forums and use my experience for tips and tricks. I present individual topics in detail and in depth to enable optimal use of AdSense.
To the vita
If you have any suggestions, comments or proposals for the blog post, please contact me bye-mail.I am happy to receive feedback!


 After
After 

